Connectivity Software User's Guide and Reference
Making a first OPC UA application with QuickOPC using imperative programming
If you are targeting the .NET 8+ development platform and not the .NET Framework, see Getting Started with QuickOPC under .NET 8+ using full IDE instead.
If you are interested in QuickOPC-UA, your task will most certainly involve reading data from an OPC server. The procedures in this article show the steps that illustrate how to achieve that, using Microsoft Visual Studio and .NET Framework. The steps are quite similar if you are using other tools or a different programming language.
Two procedures are described below - select the one that is closest to your use case:
In this Getting Started, we will use C# to create a simple form that will read a float value from the OPC server when loaded, and immediately display the formatted value in the text box on the form.
Install QuickOPC. Make sure that you have selected an installation choice that includes .NET development.
In the Launcher application (at the root), double-click "Install Visual Studio Extension". The VSIX Installer will start. When presented with the dialog that asks for confirmation to install the Connectivity Studio extension, press the button. When the installation is complete and the corresponding dialog is displayed, press .
Start Microsoft Visual Studio, and create new Visual C# or Visual Basic project, selecting “Windows Forms App (.NET Framework)” template. Make sure that in the lower part of the “New Configure your new project” dialog, the framework is set to “.NET Framework 4.7.2” or later.
Instantiate the EasyUAClient component in the form: Drag the EasyUAClient component from the “QuickOPC Components” tab of the Toolbox to the form’s design surface.
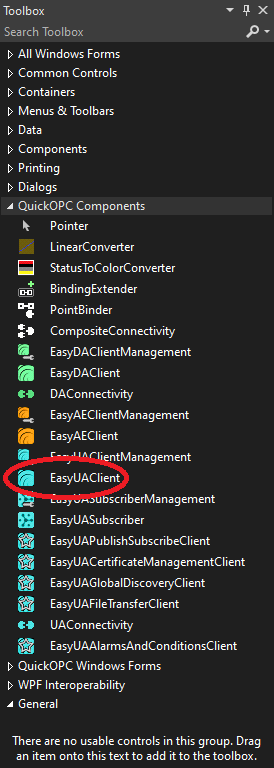
An icon labeled “easyUAClient1” will appear below the form.
If the needed components do not show in the Toolbox: See Troubleshooting the Visual Studio Extension.
Note: This is just shortcut way in Windows Forms to declaring and instantiating the component. In other environments, you can instantiate the component using the ‘new’ (C#) or ‘New’ (VB.NET) keyword, or any other way provided by the language or tool you are using.
Add a textbox to the form: Drag the TextBox component from the Toolbox to the form’s design surface. The text box should appear on the form, and in the Properties window, you will see that it has been given a “textBox1” name.
Add handler for the Load event of the form: Select the form by clicking on its design surface (make sure that you do not have any other control selected). Then, in the Properties window, choose the “Events” view (orange lightning icon), and double-click the line with “Load” event (it is under Behavior group). A “Form1_Load” text in bold font will appear next to the event name, and a new event handler will be created for the Load event. The text editor will open for the code, and the caret will be placed into the Form1_Load method.
Add following code to the beginning of the Form1.cs file:
using OpcLabs.EasyOpc.UA;
Write the event handler implementation. Add the following code to the body of Form1_Load method:
textBox1.Text =
easyUAClient1.ReadValue("opc.tcp://opcua.demo-this.com:51210/UA/SampleServer",
"nsu=http://test.org/UA/Data/;i=10853").ToString();
Build the project.
Run the application and observe the results. The text box on the form will be filled with a float value we have read from the OPC server, using a single code line!
If you are targeting an environment different from Windows Forms, look at the Console Application procedure below, because it will be closer to what the other environments require..
|
In runtime, all user interface features (such as controls, dialogs, and live binding; Windows Forms and WPF) and non-visual components are supported both under .NET Framework and .NET 8+. However, "designing" them (this includes tasks like dragging from the Toolbox, or configuring in Properties window) in Visual Studio is only possible in .NET Framework projects. In order to achieve visual design for .NET 8+ projects, the developer can make two project files over the same set of source files, one targeting .NET Framework and one targeting .NET 8+, and use the project that targets .NET Framework for visual design tasks. |
In this Getting Started, we will use C# to create a simple console program that will read a float value from the OPC server when loaded, and immediately display the formatted value on the console.
Start Microsoft Visual Studio.
In this step, we will create a new .NET Framework console application project.
In Visual Studio, select -> -> from the menu. In the Create New Project dialog, select Console App (.NET Framework). Press the button; on the subsequent screen, press the button.
In this step, we will add a reference to the OpcLabs.QuickOpc NuGet package.
In Visual Studio, switch to the Solution Explorer window, right-click on the project node (ConsoleAppn), and select command. In the NuGet: project window, switch to the Browse tab, and type OpcLabs.QuickOpc into the search box. Select the OpcLabs.QuickOpc package in the package list in the left pane of the window. In the right pane of the window, verify or change the package version next to the Version label. The version should be "Latest stable 5.84.build" (where build is a build number). Press the button.
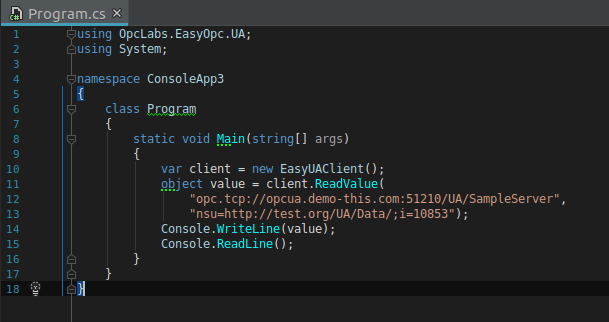
Open the Program.cs file, and add following code to the beginning of the file:
using OpcLabs.EasyOpc.UA;
In Program.cs, replace the body of the Main method by following code:
var client = new EasyUAClient();
object value = client.ReadValue(
    "opc.tcp://opcua.demo-this.com:51210/UA/SampleServer",
    "nsu=http://test.org/UA/Data/;i=10853");
Console.WriteLine(value);
Console.ReadLine();
The program may now look like this in the IDE:
In Visual Studio, select -> (F5) from the menu, or press the corresponding button on the toolbar.
This will build and launch the program. The value will be read from the OPC server and displayed on the console. Press Enter to exit the program.
If you are targeting an environment different from the console application (such as Windows service, Web app, or WPF), your steps will be similar.